Thursday, October 17, 2013

Shadowsea Kickstarter relaunched


Recently, Antimatter Games launched a new Kickstarter campaign to fund the revamp (complete with new miniatures) of their Shadowsea skirmish game.  This is the sister game to the lovely DeepWars, set on the surface of the Underlands.  The rules will be updated to be compatible with DeepWars, and indeed both rulesets can be played simultaneously (which could make for some interesting games!)

Ever since I got into DeepWars, I have been nothing but impressed with the quality and detail of Antimatter Games' products. They turn out a great ruleset, with beautiful figures and great customer support.  The price per figure is a bit more, but you usually need less than 10 models for a well-rounded force, so it is a relatively cheap game to play.

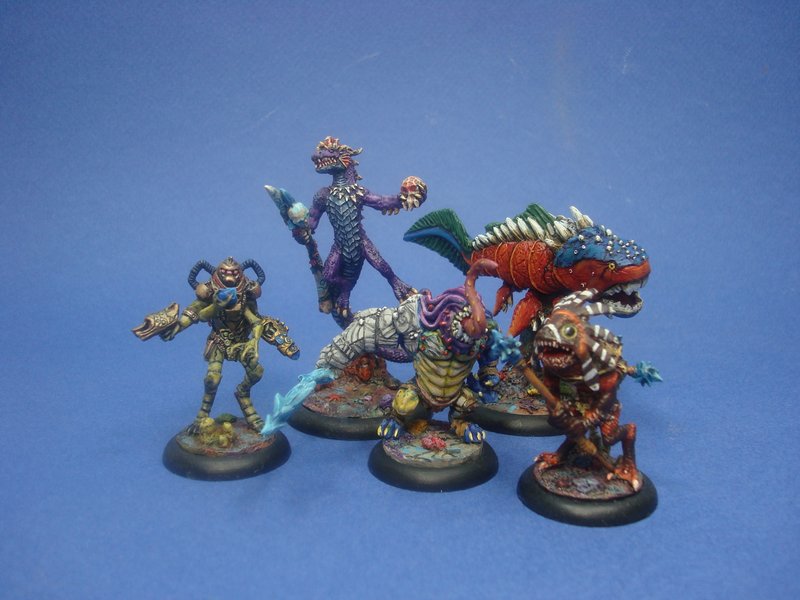
The campaign has reached it's funding goal (horray!) but it is slowing down currently as they try to unlock stretch goals.  There is some really awesome stuff to be had, and some great deals available.  Some sculpts have been mostly finished, and pictures have been posted, which I will copy here:


To make things even better, Antimatter Games recently acquired the Dragonblood line of miniatures from Cavalcade miniatures, who are closing down.  The Dragonblood miniatures were the original miniatures sculpted for ShadowSea, so they are now available as part of this campaign.  Backers really are spoilt for choice!

Here's to hoping we can get some more backers in the last two weeks and unlock a plethora of new models from the stretch goals.  I really want those Sunless Kingdoms models :)

Friday, September 13, 2013

Dipped Windmill Finished

I have now finished the windmill upon which I was experimenting.  I am quite pleased with the results, though I imagine that the quality of the piece would make it hard to get a bad finish.  This tabletop world terrain is simply mind-blowing.

Anyway, after a bit more painting, and dipping, and pinning and gluing, I had the windmill 'finished' to the point of requiring only some touchups and a coat of matte varnish.


That would work well in a pinch, no?  While it looks nice, I found the metal was too shiny for something left out in the elements, and the stones needed some weathering and differentiation of colours.  A healthy number of stones were given a wash with a mix of brown and red ink.  The metal was given a similar was to simulate oxidation.  I then washed the bottom bit of the windmill with green and brown to simulate moss and moisture growing up from the ground.  Lastly, a drybrush of the stones to bring out the detail, as well as the blue shingles, and a few touchups here and there give us the finished product.  It was sealed with a spray of Testors dullcote.


Lastly, we shall give a parting shot with the wizard of the tower (should we just call him the miller or something?) with a landsnkecht mercenary.


I hope you enjoy the photos.  It would be nice to use all this stuff in a game for once.  One day...


Tuesday, September 3, 2013

Recipe for dipping... and terrain

I am sure there are a few folks out there who have used future floor polish to make washes and stains for miniatures in the past.

It is an acrylic floor polish which has magical properties to flow into every recess of a miniature, while leaving only a small amount on the raised detail - perfect for shading details.  It dries to a hard, glossy finish which will require some matte varnish to overcome, but it typically gives a good result.

As for the recipe in question, here it is:

1. One bottle of Clear Floor Finish.
2. Black India Ink
3. Brown India Ink
4. A Tap
5. A container with a VERY tight lid (I would recommend a large mason jar)

Mixing intructions:

1. In the Mason Jar put in 150 mL of Future Floor Finish.
2. Add 30 mL of black ink, and 30 mL of brown ink. Then, add 60 mL of water.
3. Mix well and let it sit (Until all the bubbles are gone).

After that, you use it as you would any other wash or dip - flow it onto a basecoated miniature for instant shading.  It won't win you any painting awards, but it will help you get good tabletop standard miniatures out quickly.  Just make sure not to forget the  matte finish!

For my recipe, I could not source brown India ink locally, so I used an acrylic ink instead.  So far my house has not burned down, and all seems to be fine.  Except that the brown pigment seems to settle out a bit on the bottom.

For my first victim, I started painting my Tabletop World Windmill. I cheated a bit, in that I primed the main building grey, and the roof brown.  From there, it was a heavy drybrush of light grey for the building, with brown, blue, and silver for the wood, windows, and metal, respectively.  For the roof, I drybrushed two shades of blue on the shingles, and two shades of brown on the wood.  The metal was done in silver.  Then I applied the wash, and that is as far as I have gotten (no matte finish yet).  I might do one more round of drybrushing, and a bit of inking on the bricks, but the building is mostly done, save for the sails.


Not bad for minimal work, IMHO.  Here you can see it with a few Oldhammer friends:


It certainly helps that the Tabletop World scenery is top notch.  This stuff practically paints itself.


Monday, August 12, 2013

Lead Adventure "Death Bell" Cannon

I have a nice little surprise for you!  No, it is not pictures of the completed reiksguard unit (don't worry, its finished, just actually need to take the pictures).  I finished a cannon for my Oldhammer army.  This is no ordinary cannon, however.

Lead Adventure Miniatures  recently released a new cannon for their Bruegelburg range.  This one, however, was built by the revolting peasants of Schweinstein.  It is a repurposed bell, and it absolutely fantastic.  Here is a nice picture of the sculpts:


Now here is my take on it with a lick of paint:

A total blast to paint, the bell was beautifully detailed and took to some verdigris staining very well.  These minatures look so nice, I decided they also needed a scenic base:


The base was from 4ground, and I used some miscellaneous Hirst Arts blocks, a GW fence, and then the usual sand, flock, tufts, and flowers.  It really brings the piece to life and helps show off the immense character of these figures.

My only criticism of LAM is that some of the faces lack a certain amount of character, with somewhat sharp defining lines.  Though that is not all of them, and much of the time you can make up for it with a good paintjob.  Hope you like the cannon, I would recommend it to anyone.


Thursday, June 27, 2013

Some WIP of the Reiksguard

A few people  had asked me a while back for a few WIP pictures of my miniatures to demonstrate the inking technique I have been using.  I got a couple pictures, but not completely step by step.  I would like to say I did not get enough pictures because the technique is just that fast, but in reality I am just more forgetful, and sometimes lazy.

First picture, I have painted on the metal areas, and have put the vallejo sepia onto the brown areas - wood and leather, mainly.

In the next WIP shot, you can see the colour has been added to most of the cloth.  I also put a wash of GW Ogryn flesh wash on the flesh areas.
From here, They are pretty much ready for a black wash on the armour, a few details, and picking out the highest highlights with some regular model paint.  Then they are finished!
This is the same pic as my previous post.  I probably spent about three hours to paint these five figures (though I did not time myself, so it may have been a bit more).

Try it out... its pretty easy to do!


Wednesday, June 26, 2013

Some OldHammer Reiksguard

In addition to my lonely wizard, I started painting a unit of Imperial 'Reiksguard'.  Well, mostly... they are a mix of foot knights and fighters from the marauder era, which will represent my Reiksguard.  Its a good excuse to paint them up, and I like the way the unit is coming together.  Oh yes, I also tossed in a WK dwarf for good measure.  Why not?

So far, I have painted up 15 of the guys, though the shields are not yet done for them all.  Here is the whole group:

For these figures, like the wizard, I am using a grey primer followed by a white zenith prime, and then using inks and diluted paint for most of the paintjob.  The inks are very fast, and give a nice result.  Though I have been going over the highest areas with some opaque paint for my final highlight, and I like how it turned out.  Here are a few closeups:

These were the first five painted.  Second group:

And finally, the third group:

It is turning out to be a wonderfully characterful unit, and the prolific armour makes these guys dead easy to paint up quickly.  Mostly basic block colours for these guys - less time, and it still looks good in a group.  Only five more to paint and my unit of twenty is finished.


Saturday, June 8, 2013

Starting with OldHammer

Yes, another project on the go!  Some of you may have heard of the recent resurgence of old-school fantasy gaming known as OldHammer.  Mostly, it is people gathering together to play earlier editions of Warhammer Fantasy, typically 3rd edition, which put a higher focus on fun gameplay and storytelling rather than competitive list building.  Not to mention that the rules and armylists are contained in two books only (for which pdfs can be found if you know where to look) and since those editions are long past, you don't have to worry about changes to the game.

Did I mention that the old school miniatures are awesome?  Lovely chunky metal with lots of character, and are also fun to paint!

Anyway, my local gaming group has decided to give it a try, so I have put together an armylist and have started the assembly.  As my first test figure, I decided to paint up a wizard.  This little fella was in my stash of stuff.  I forget where he is from, but I really had a blast painting him.

I tried something new - dark primer (I used grey) with a white zenith prime to start (ie, spray from the top down, to help with highlights).  Much of the block colours were painted using inks with a few painted highlights,  but it really sped up the process and looks very nice to me.  Without further ado, here is my new wizard:


Simple, but fun.  I really like the grisly finger mounted on his staff.  Hope you all like him as well!

Friday, May 24, 2013

Scaly Horde Finished

This past week I finished the last two models for my starter Scaly Horde warband for DeepWars.  Both were quite fun to paint - the Abyssal Gark and the Steel-Jaw Placoderm fish.

Starting with the Gark, I chose a colour scheme that was somewhat inspired by a crown of thorns starfish - a bluish body with red spines.  I figured his belly needed to contrast, hence the cream colour.  I tried to make a spotted transition between the colours, and it kinda worked but not as good as I had imagined in my mind.  It was good practice though!


All in all I am happy with the result.  The armour on the right arm and the crystal trident are my favourite parts.  It was also fun to try a different paint scheme from the official pictures.


Next up was the Steel Jaw Placoderm Fish.  This beast of a model painted up quite easily.  The details are quite pronounced which made drybrushing and highlighting quite simple.  I chose a few colours at random, and here was my result:


I don't think I would want to see that while snorkeling for treasure...

Here is a group shot of the finished Horde.  Next up, I will start to chip away at some Fortune Hunters to oppose them.

Hope you like it!


Wednesday, April 17, 2013

Kelp Forest for DeepWars

Life has been quite busy around the Timbor household of late.  That is primarily due to the arrival of a new little goblin, thanks to the hard work of Mrs. Timbor!  The family is well and fine, but it does leave less time for hobby work.

That being said, I managed to finish something fun this week - another piece of scenery for DeepWars!

I was out at my local Petsmart, and they had a bunch of aquarium plants on sale, so I picked up a few for the various DeepWars terrain that has been floating in the back of my mind for some time now.

The Kelp Forest terrain is used in games set in the Shallow Sea environment, and provide cover for your troops while also counting as a difficult terrain (I can imagine a massive tangle of kelp would be hard to navigate if you are not an otter).  These pieces were pretty easy to manage, so it should not be too hard to recreate if you so desire.

To start, here is a nice group shot with some of my Scaly Horde figures hiding amongst the leafy branches.


I made two pretty much identical pieces.  The materials used:


- plastic aquarium plants
- green floral wire
- sand borrowed from nature
- hot glue and PVA glue
- large tree base from 4ground terrain
- a few crystals from Anarchy models
- some craft paint

A couple closeups:


I really like the 4ground tree bases, as the plants are removable for ease of use during gameplay:


So there you have it, I hope you enjoy my latest addition to the DeepWars table I am making!

Monday, March 11, 2013

Incoming Saxons!

I promised you some Saxons, did I not?  Well, better late than never, or so I have heard.  To be fair, one unit of these was finished before Christmas, I was just sitting on them for a while before taking pictures.  I was pretty active over the last month, finishing these other two units among other things - more on that later.

These Saxons are a mix of Gripping Beast and Wargames Foundry models, and I find they mix ok.  The Foundry models typically have better sculpted faces, and thus look better all around.  The Gripping Beast Saxons look taller and more imposing however.  They have been armed with a smaller buckler which was apparently more common with the Saxons of the 5th century.

Group shot:


A nice mixed yet somewhat disorderly line.  I am happy with how they turned out compared to the time I spent painting them - I tried to be as quick as possible without making them look rubbish.  This is the first unit I finished:


The figure front and centre is my favourite of all.  One of the Foundry miniatures.  Let's have a closer look, shall we?


I think the sculpting on the hand, and his moustache make him full of awesomeness.  He was quite easy to paint up as well.  Here is another closeup from this group, probably my second favourite from this bunch:


On to the next unit I painted:


I think my favourite from this group is the drunkard in the back.  He is actually a Gripping Beast viking (along with his drinking buddy from the first group) but I thought I could sneak them in without too many people noticing.


Front and centre is another fine figure from Foundry, whose smooth facial features lend to easy painting:


Lastly, a more stern and seemingly organized group - outlined by the lack of drunken louts (or perhaps I just ran out of suitable miniatures). 


Front and centre is an imposing and dour figure from Gripping Beast.  I thought he looked serious enough that his men should all appear ready to fight.


There were a couple nice, dynamic poses from this group as well.  It is always fun to paint up figures with different features and poses.  This has been a really fun project.


I hope you like these guys.  I have decided to use them first to play a game or two of SAGA, instead of Dux Britanniarum.  Mostly because I need less models to play SAGA, and it seems a bit easier to teach newcomers.  All I need to finish is a Saxon warlord and a British warlord, and choose suitable factions for them to represent, as SAGA is set about 300 years after the time period in which I have based my Arthurians and Saxons.  Enjoy!